Frequently Asked Questions

Yes, you can use Smart School without internet on localhost installation (using XAMPP or WAMP) but you will lose the benefits of some features like -

  • Email, SMS and Push notification and messaging
  • Online Payment
  • YouTube videos

If you are using Smart School with internet on localhost installation then above mentioned features will work.
Yes, you can use Smart School on localhost installation (using XAMPP or WAMP) and access it in your local LAN (Local Area Network) from other pc in network. How to configure Smart School for local LAN network please check this article.
By default display error messages are disabled in Smart School that is the reason every time if there is any error occurred system is showing 500 error message. This is due to Smart School environment is set for production . To enable display error message you should change Smart School environment from production to development.

Please do the following changes in code files to change environment -

Open file \index.php in any editor carefully from your installation folder and find

define('ENVIRONMENT', 'production');

and change it to

define('ENVIRONMENT', 'development');


Be aware that in development mode you may see some errors and deprecation warnings, for this reason, it’s always recommended to set the environment to “production” .

Do not forget to turn it back to production when you have finished the error checking or debugging
If you have any general questions don't hesitate to contact us on support@qdocs.in and for support questions you can open support ticket at http://support.qdocs.in
Smart School does not support 3 decimals places for a number or currency amount.
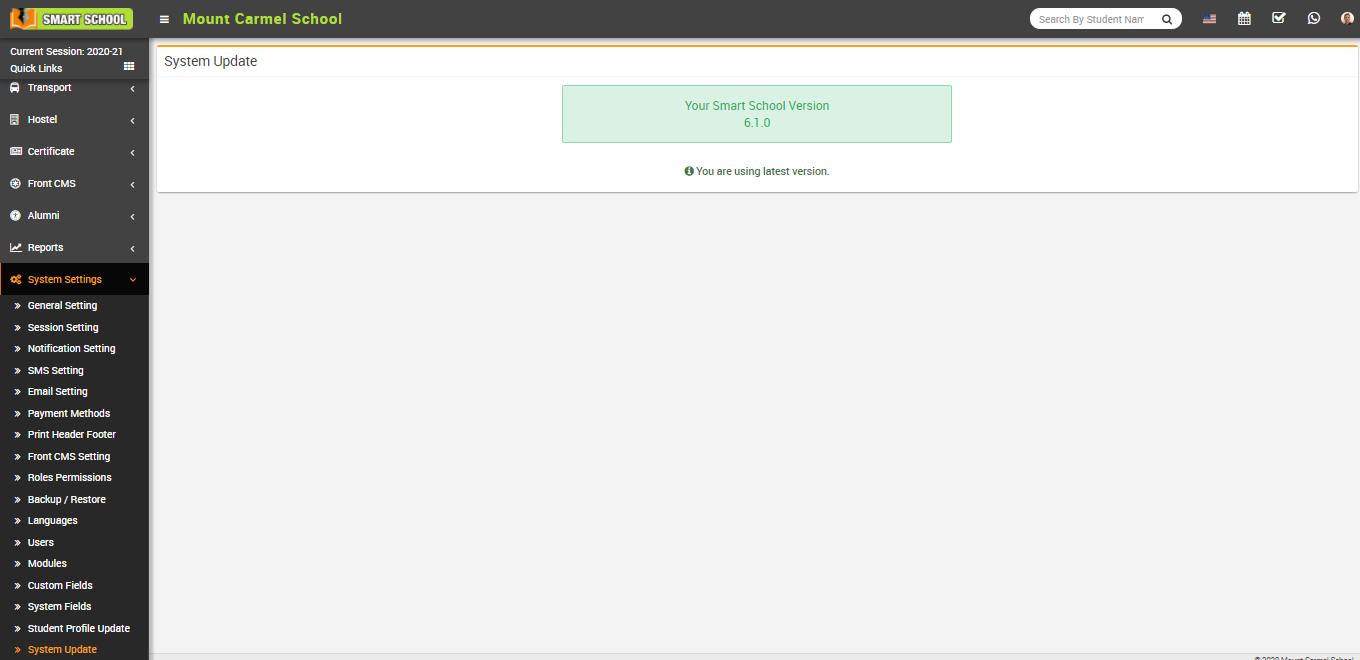
To check Smart School Version, login from superadmin panel and then go to System Settings > System Update link. Here you can see your current Smart School Version.

Smart school version image
Yes, Smart School support RTL direction for languages.
Unfortunately not, the PDF or exported documents are only generated in LTR direction.
After adding staff or student if no email is receiving or there is no any email send by system then your email setting is not configured properly so system is unable to send any email. To configure email please check this article.
Unfortunately you can’t use Smart School as SaaS or multi school application. Even you can not edit or customize Smart School to make it SaaS or multi school application due to its licensing terms. Smart School licenses are single end products, additional information for licenses can be found here.
No, currently unicode characters for non English languages does not supported in data export from table or datatable.
In Smart School avoid to enter or using special character (special character is non-alphabetic and non-numeric like @, #, $, <, %, ^, &, *, !) for any field like Student, Staff, Income, Expense, Transport, Custom Field etc, otherwise it may fail PHP or JavaScript processing.
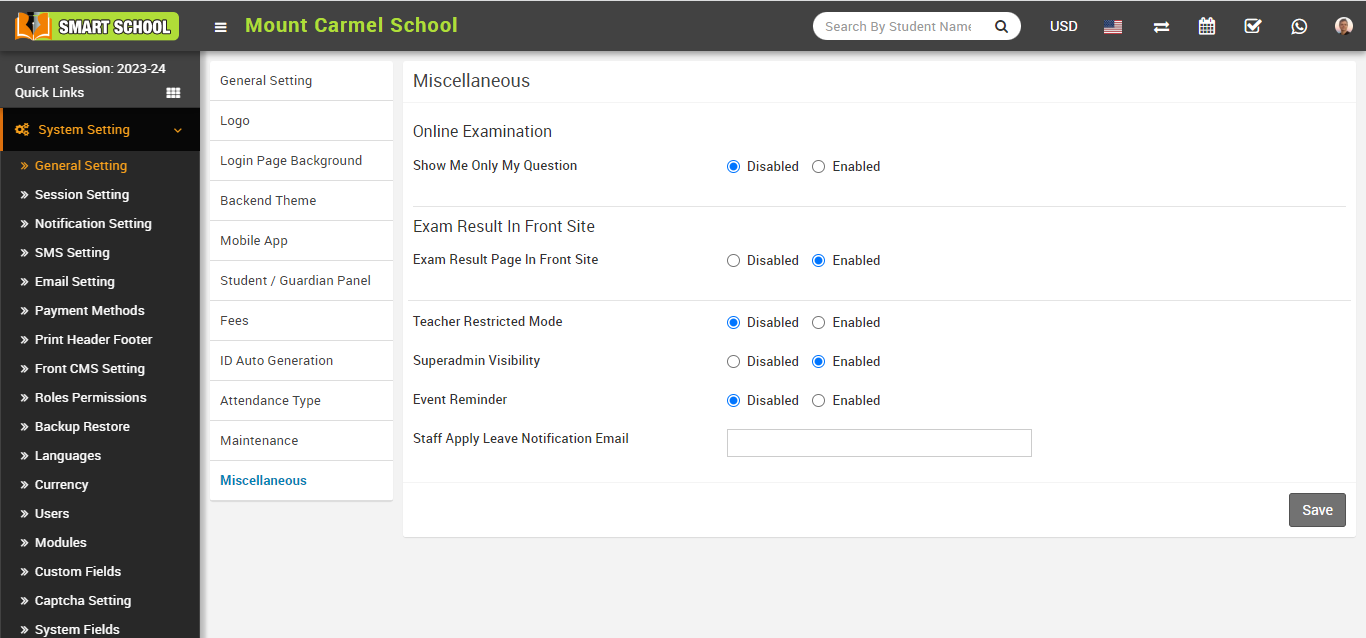
For student data access separation there is a Teacher Restricted Mode feature is available, by default teachers can access all student data but when Teacher Restricted Mode (System Settings > General Setting > Miscellaneous > Teacher Restricted Mode) is enabled then teacher can see only their assigned class-section or subject, student related data for different modules like Exam, Homework, Lesson Plan etc.

 
Note:- please note that if you have assigned teacher as a class teacher to the class then this teacher will be able to manage their assigned class related all data like Homework, Timetable etc even course/subject not assigned to this class teacher.

How to assign Subject Teacher -

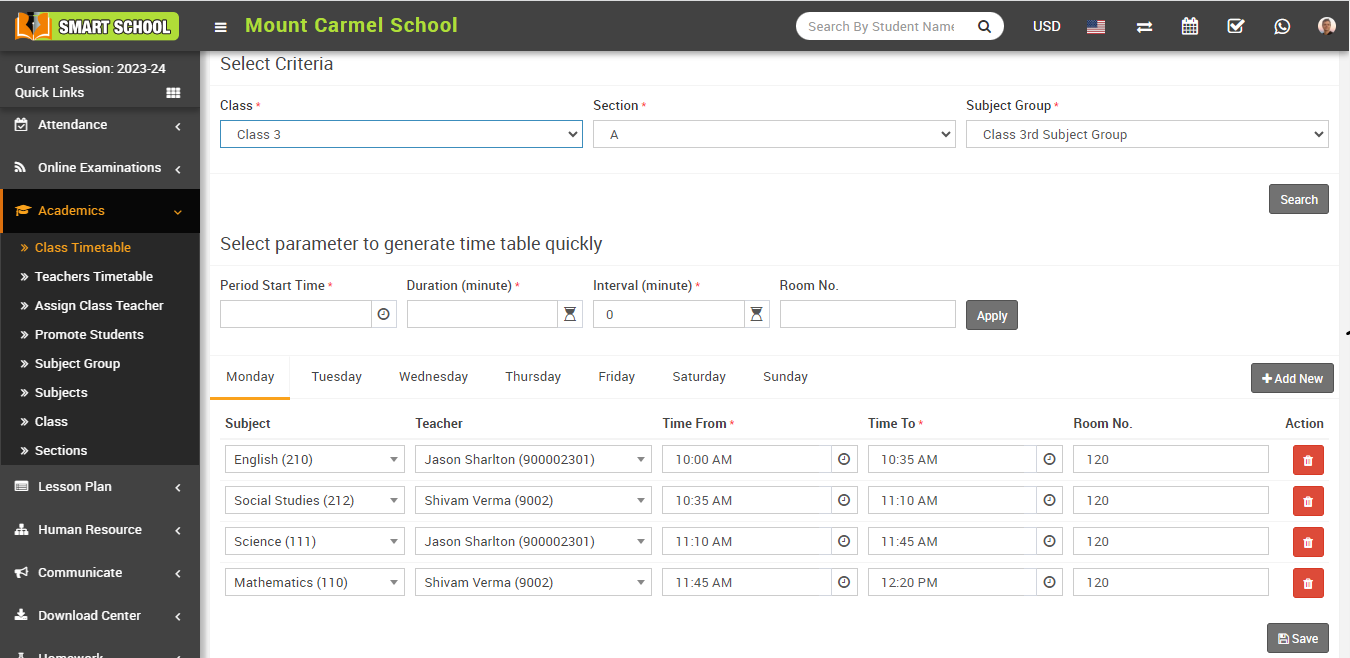
To assign Subject Teacher you need to create Timetable from Academics > Class Timetable for the class and from here you can choose subject and can assign teacher to those selected subjects.
In Smart School you can assign fees for each student by creating fees groups from Fees Collection > Fees Group then Fees Collection > Fees Master (create fees by selecting fees group here) and assign to student from Fees Master > Assign/view Fees. Please check the following documentation https://smart-school.in/docs/#feescollect for more understanding.

To take attendance in Smart School automatically through biometric attendance device you should have Smart School Biometric Attendance App (desktop application) and Biometric Attendance Device. Smart School Biometric Attendance App supports multiple biometric attendance devices so you can add multiple devices and take attendance with them simultaneously. You should purchase compatible biometric devices at your end from any online store or from your local market. To purchase Smart School Biometric Attendance App please contact to support https://support.qdocs.net/ .


Using biometric device and its configuration all details will be provided in its documentation. With Smart School Biometric Attendance App purchase you will get Windows OS executable files, runtime and installer, documentation.


Price -

Smart School Biometric Attendance App price: USD $99 or INR Rs.7500 (without payment processing fees) with 12 month support with lifetime free updates.


Biometric Device Specifications -

Smart School Biometric Attendance App supports any biometric attendance device which supports ZKTeco Firmware with Push Data (atleast Push Service Ver. 2) feature. For development we have used (ZKTeco K60) for reference purpose only, you can purchase device from your local market or from your country online site for same specification) model device.


Below are a list of items you should ensure your computer hardware/software should comply with to install and run Smart School Biometric Attendance App -

- Atleast Intel i3 processor or its equivalent other processor

- Atleast 4GB of RAM

- Atleast Microsoft Windows 7 - 64 Bit Operating System

- Broadband Internet connectivity with minimum 1 MBPS speed


You can check the documentation of Smart School Biometric Attendance App at https://smart-school.in/ssba-docs/ .


If you still having any doubt about Smart School Biometric Attendance App then feel free to ask at support.

Examination and Online examination both are different modules.
Examination Module: It is used for regular/offline examination where exam based on theory or practical and student answer in this exam on pages based answer sheet. Suppose a regular maths exam of class 7 should be conduct in school's class using question paper and answer sheet.  After examination student should submit answer sheet to examiner. Finally student marks should be entered in exam marks and their result and marksheet will be prepared.
 
Online Examinations Module : It is used for online examination where question, exam, answer everything is created under Smart School and student take exam online through computer and submit their answer immediately. After result  published student can check their result online.
 
In Smart School you don't have to create subscription fees for every months because student fees are not something like subscription billing which can be vary month to month depends on services usage. Student fees are pre decided at time of student admission so in beginning of academic session you will configure and create all fees for all students with their due dates. Although you can change assigned fees at any time of student because fees are calculated in real time.

To understand how Smart school fees collection module is working please check this documentation https://smart-school.in/category/fees-collection
If you are getting alert message "Sorry! You are not belonging to any class for current academic session." while login to student account so this message is occurred when a student is login which is belonging to an academic session and that session is not currently set as current academic session in your Smart School System Settings > General Setting. So please check for your current academic session.  
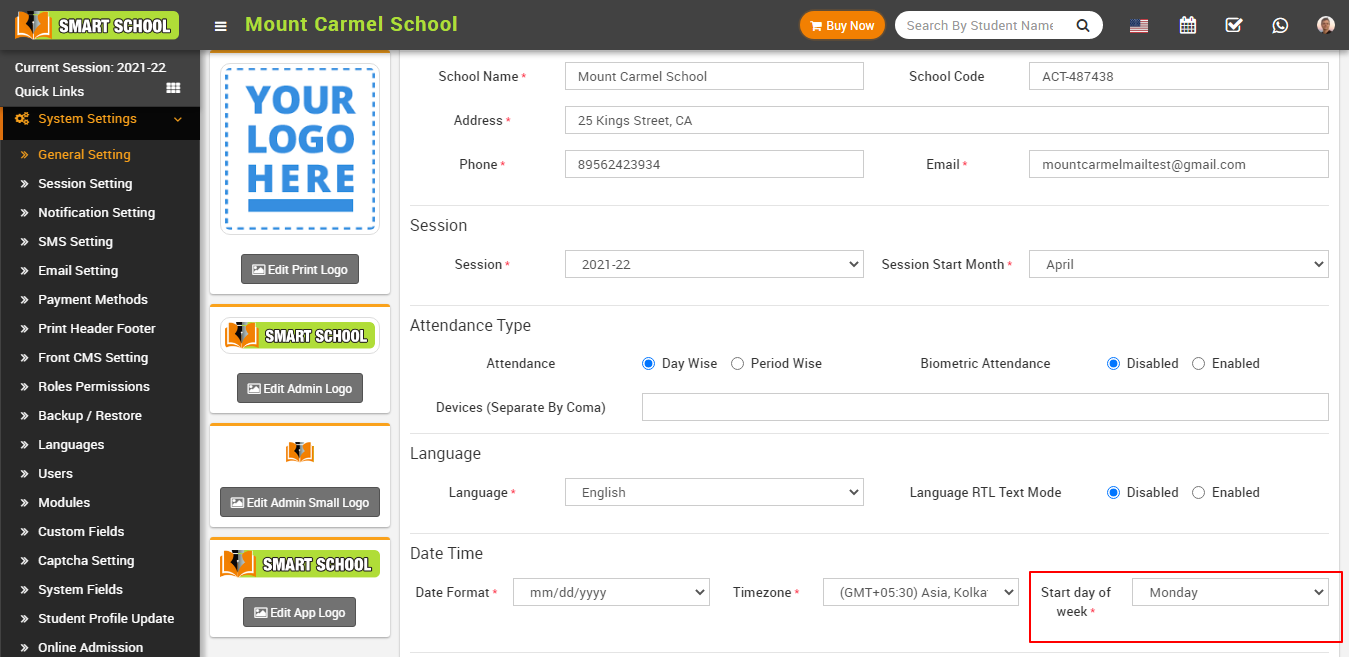
To set start day of week for timetable go to System Settings > General Setting, here you will find option Start Day of Week to set start day according to your country.

In Smart School, if you want to change text labels like if you want to change text lebel of "Academics" to "Academics Settings" then for this you should go to the Language file location, here first you should select the Language file according to your country language and do changes in that language file.

For e.g. if you want to change text lebel of "Academics" to "Academics Settings" in English language then go to the file path location \application\language\English\app_files and open system_lang.php file then serach for the keyword "Academics" 
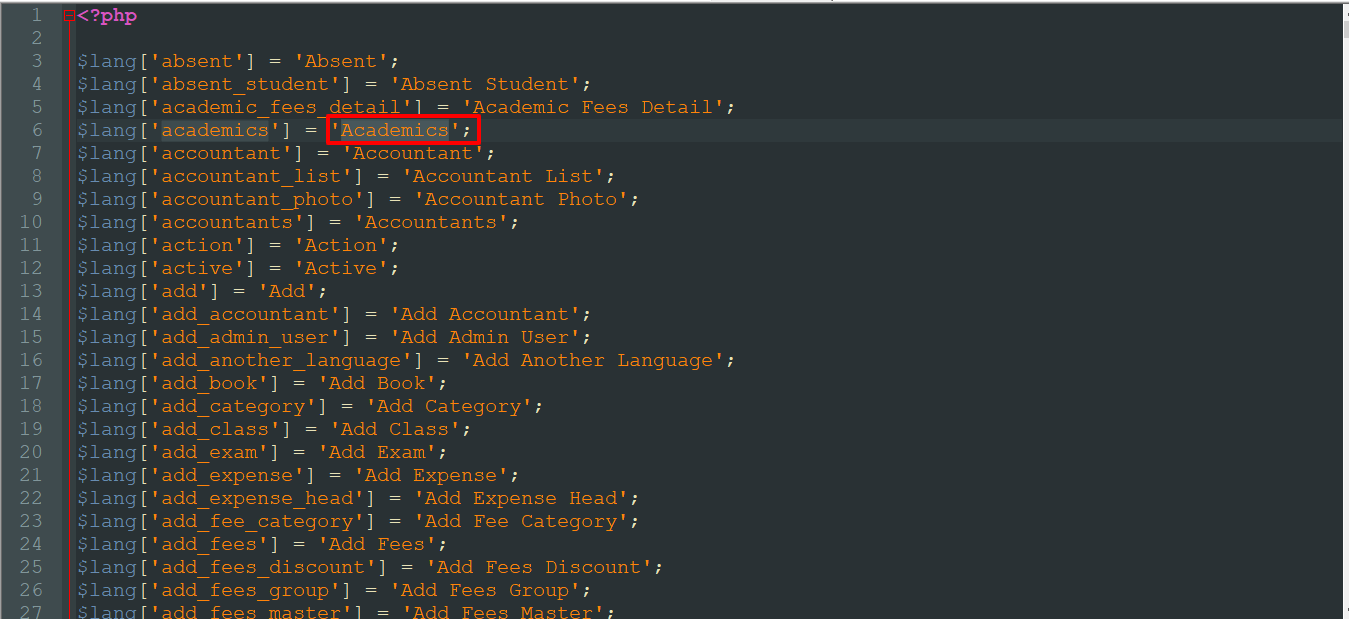


Now replace it with "Academics Settings" then save it.
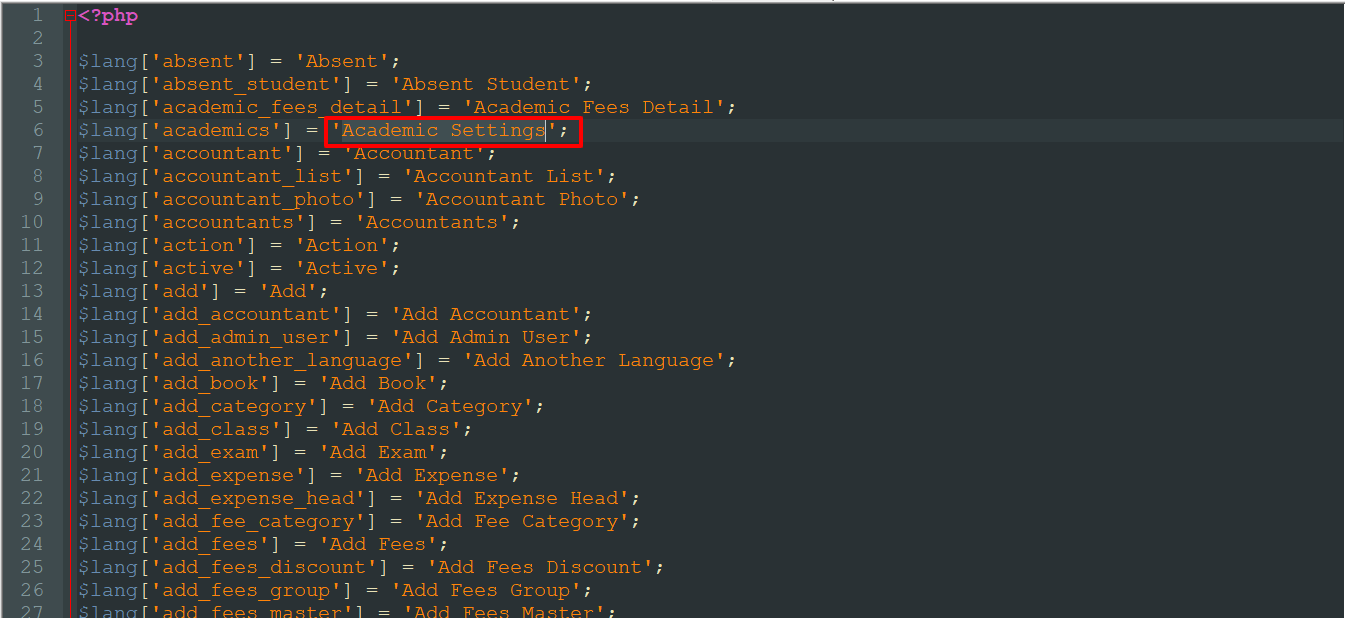


After save changes it will look like below image at Smart School site.


Note- Please make sure you have done changes in proper format (like Academics Settings must be under single inverted commas) otherwise code will cause an error.
Smart School

Categories

Smart School © 2024 All Rights Reserved